As part of this discussion , we will Build a RESTful Webservices using the following Technologies.
Let’s build the components one by one.
We will have the below project Structure once we are done with the coding part.
Project Structure

database.properties
For our example, we will be connecting to MySQL DB, so the below config has all the necessary details like Driver Class, DB Url, username and password.

pom.xml
We need to add spring-boot-starter-parent as the parent. Please add the below dependencies.
- spring-boot-starter-web
- mysql-connector-java – for MySQL Driver class and other MySQL specific classes.
- spring-core
- spring-context
- spring-jdbc
- spring-tx
- spring-web
- jackson-databind

Application Class
This is the Application initiation class. We need to invoke the main method to trigger the Spring Boot Application.
Here , we need to configure the beans for datasource and jdbcTemplate.

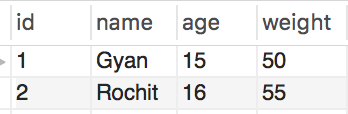
Student – The bean class for mapping the data in the DB table rows.

DB Table – with sample records
StudentMapper
The below class is used by JdbcTemplate to map the ResultSet records to Student bean.

StudentDAO
Interface with all our DAO APIs.

StudentDAOImpl class
DAO Implementation. These APIs are invoked by our StudentController.

StudentController – REST Controller which gets invoked by the RESTful Clients

Invoking RESTful APIs
Let’s invoke our RESTful APIs via curl .
We can also use other client tools such as Postman for consuming the RESTful Service APIs.
We can also use Java based REST client such as Spring RestTemplate , Jersey, Apache HttpClient, Apache CXF etc for consuming the APIs.
Get All students Again Before Performing all Operations
Request:
curl -v localhost:8080/students
This will invoke the getAllStudents API in our RestController which is mapped for the pattern /students.
Response:
[{
“id”: 1,
“name”: “Gyanendra”,
“age”: 15,
“weight”: 50
}, {
“id”: 2,
“name”: “Rochit”,
“age”: 16,
“weight”: 55
}, {
“id”: 3,
“name”: “Vivek”,
“age”: 18,
“weight”: 55
}, {
“id”: 6,
“name”: “Shyam”,
“age”: 14,
“weight”: 48
}, {
“id”: 8,
“name”: “Ravi”,
“age”: 17,
“weight”: 65
}, {
“id”: 9,
“name”: “Teja”,
“age”: 14,
“weight”: 58
}, {
“id”: 11,
“name”: “Viku”,
“age”: 16,
“weight”: 44
}, {
“id”: 12,
“name”: “Ajay”,
“age”: 16,
“weight”: 44
}, {
“id”: 13,
“name”: “Ravi”,
“age”: 16,
“weight”: 44
}]
Find Student with id =1
Request:
curl -v localhost:8080/students/1
This will invoke the findStudent API in our RestController which is mapped for the pattern /students/{id}.
Response:
{
“id”: 1,
“name”: “Gyanendra”,
“age”: 15,
“weight”: 50
}
Add New Student
Request:
$ curl -X POST localhost:8080/addStudent -H ‘Content-type:application/json’ -d ‘{“id”:15,”name”:”Ramu”,”age”:18,”weight”:47}’
This will invoke the addStudent API in our RestController which is mapped for the pattern /addStudent for Post Http Method.
Response:
{
“id”: 15,
“name”: “Ramu”,
“age”: 18,
“weight”: 47
}
Update Student for id = 3
Request:
$ curl -X PUT localhost:8080/students/3 -H ‘Content-type:application/json’ -d ‘{“name”:”Virat”,”age”:18,”weight”:47}’
This will invoke the updateStudent API in our RestController which is mapped for the pattern /students{id} for Put Http Method.
Response:
{
“id”: 3,
“name”: “Virat”,
“age”: 18,
“weight”: 47
}
Delete Student with id =13
Request:
curl -X DELETE localhost:8080/students/13
This will invoke the deleteStudent API in our RestController which is mapped for the pattern /students{id} for Delete Http Method.
Now, let’s try to fetch the Student with id =13
curl -v localhost:8080/students/13
Response:
{
“timestamp”: “2020-02-09T19:05:28.849+0000”,
“status”: 500,
“error”: “Internal Server Error”,
“message”: “No Student found for id :13”,
“path”: “/students/13”
}
Get All students Again After Performing all Operations
Request:
curl -v localhost:8080/students
This will again invoke the getAllStudents API in our RestController which is mapped for the pattern /students.
Response:
[{
“id”: 1,
“name”: “Gyanendra”,
“age”: 15,
“weight”: 50
}, {
“id”: 2,
“name”: “Rochit”,
“age”: 16,
“weight”: 55
}, {
“id”: 3,
“name”: “Virat”,
“age”: 18,
“weight”: 47
}, {
“id”: 6,
“name”: “Shyam”,
“age”: 14,
“weight”: 48
}, {
“id”: 8,
“name”: “Ravi”,
“age”: 17,
“weight”: 65
}, {
“id”: 9,
“name”: “Teja”,
“age”: 14,
“weight”: 58
}, {
“id”: 11,
“name”: “Viku”,
“age”: 16,
“weight”: 44
}, {
“id”: 12,
“name”: “Ajay”,
“age”: 16,
“weight”: 44
}, {
“id”: 15,
“name”: “Ramu”,
“age”: 18,
“weight”: 47
}]
Related Articles:
Spring Boot Interview Questions: Ultimate Guide 2023
Benefits of using Spring Boot


Clearly shows the effort that has gone into detailing.
Great Job.
It does great for me to have a realization of Spring Boot.Thank you guy.