
Prepare for a useful resource featuring the most important Spring interview questions and answers for 2023. If you’re gearing up for a Spring-related interview, you’re at the right spot. We’ve curated a list of over 30 commonly asked Spring interview questions and categorized them into three levels: Basic, Intermediate, and Advanced.

Let’s start with Basic Spring Interview Questions.
Basic Level: Spring Interview Questions
What is Spring Framework?
Spring Framework is a Java platform that provides comprehensive infrastructure support for developing Java applications. Spring handles the infrastructure so you can focus on your application.
Read More : Spring Framework: Let’s get started 🙂
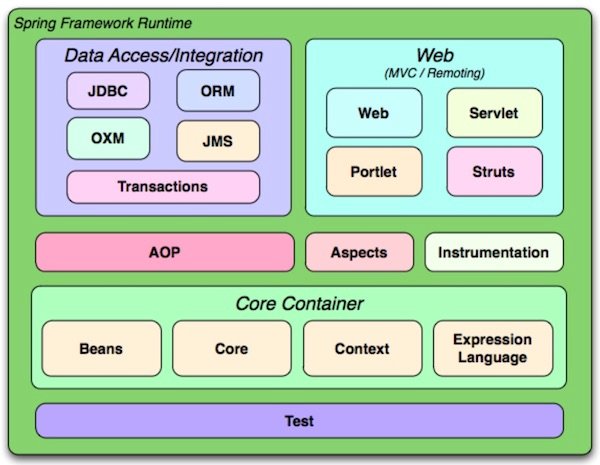
What are the core modules of Spring Framework?
The Spring Framework consists of features organized into about 20 modules. These modules are grouped into Core Container, Data Access/Integration, Web, AOP (Aspect Oriented Programming), Instrumentation, and Test, as shown in the following diagram.
Read More : Spring Modules
What are different advantages of using Spring Framework?
Key Advantages of Spring Framework are mentioned below:
- No need of Application Server:Spring enables the developers to develop enterprise applications using POJOs (Plain Old Java Object). The benefit of developing the applications using POJO is, that we do not need to have an enterprise container such as an application server.
- Lightweight and Modular:Spring is modular lightweight framework which allows you to selectively use any of its module on the top of Spring Core.
- Loose Coupling via Inversion Of Control (IOC): In Spring Framework, loose coupling is achieved using Inversion of Control. The objects give their own dependencies instead of creating or looking for dependent objects.
- Aspect Oriented Programming (AOP): By separating application business logic from system services, Spring Framework supports Aspect Oriented Programming and enables cohesive development.
- Container: Spring Framework creates and manages the life cycle and configuration of application objects.
- MVC Framework: Spring Framework is a MVC web application framework. This framework is configurable via interfaces and accommodates multiple view technologies.
- Transaction Management:For transaction management, Spring framework provides a generic abstraction layer. It is not tied to J2EE environments and it can be used in container-less environments.
- Predefined Templates:Spring framework provides templates for JDBC, Hibernate, JPA etc. technologies. So there is no need to write too much code. It hides the basic steps of these technologies.Let’s take the example of JdbcTemplate, you don’t need to write the code for exception handling, creating connection, creating statement, committing transaction, closing connection etc. You need to write the code of executing query only. Thus, it save a lot of JDBC code.
- Ease of Testability:One the feature of Spring Dependency injection helps in gearing up testability. It simplifies the injection of test data with the use of JavaBean POJO.
What are the differences BeanFactory and ApplicationContext in Spring?
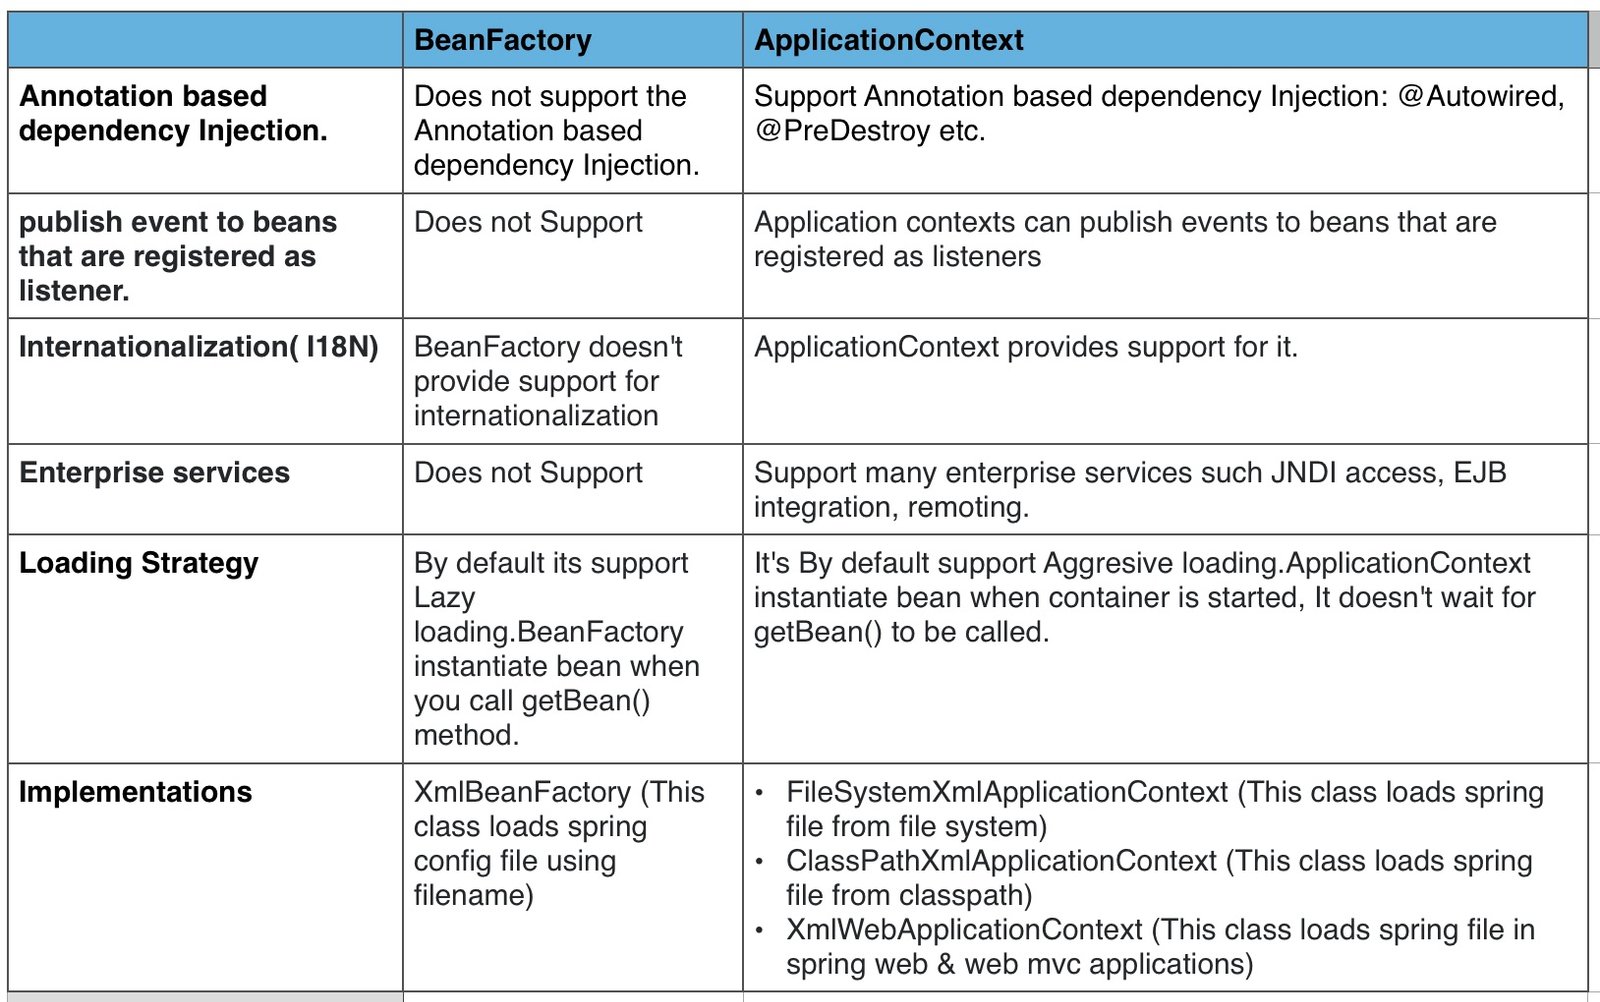
Read More: Understanding Spring IoC Container
What are different Bean scopes in Spring ?
In Spring, there are different “scopes” that you can use for beans. A scope defines the lifecycle and visibility of a bean within the application. Here are the main bean scopes in Spring:
- Singleton Scope: This is the default scope. A singleton bean is created only once in the Spring container and is shared across the entire application. Any request for the bean will return the same instance.
- Prototype Scope: A prototype bean is created each time it’s requested from the Spring container. This means that you’ll get a new instance of the bean every time you ask for it.
- Request Scope: A request-scoped bean is created for each individual HTTP request made to the application. It’s useful when you want to have different instances of a bean for different requests.
- Session Scope: A session-scoped bean is created once per user session and is available for the entire session’s duration. This is suitable for maintaining user-specific data.
- Application Scope: An application-scoped bean is created once for the entire duration of the application’s lifecycle. It’s useful when you want to have a shared instance accessible to all parts of the application.
- WebSocket Scope: Introduced in Spring 5, a WebSocket-scoped bean is created for each WebSocket session. It’s used to manage beans specific to WebSocket communication.
- Custom Scopes: You can also create custom scopes if the built-in scopes don’t meet your requirements. Custom scopes allow you to define your own rules for bean lifecycle and visibility.
What is the purpose of @Autowired in Spring?
@Autowired annotation is used for injecting dependencies in the Spring Beans.
Read More : @Autowired vs @Inject vs @Resource
What is the purpose of Spring AOP?
Spring AOP aims to increase modularity by allowing the separation of cross-cutting concerns such as logging, caching, security, transaction management etc.
Spring AOP provides a way to separate these concerns from the main business logic, making the codebase cleaner and easier to maintain.
Read More : Understanding Spring AOP
What is the use of @Component,@Controller, @Service and @Repository Annotations ?
@Component:It is a basic auto component scan annotation, it indicates annotated class is a auto scan component. It is generic and can be used across application.
@Component has three specializations (@Controller, @Service and @Repository)
@Repository: This annotation designated the bean class as a spring managed component in the persistence layer/DAO layer.
@Service: This annotation designated the bean class as a spring managed component in the business layer. It notify the spring that the class contains the business logic.
@Controller: This annotations designates the bean class as the controller in the presentation layer (Spring MVC Controller).
Explain the purpose of the @Configuration annotation in Spring?
The @Configuration annotation in Spring is used to indicate that a Java class contains bean definition methods.
import org.springframework.context.annotation.Bean;
import org.springframework.context.annotation.Configuration;

@Configuration
public class AppConfig {

    @Bean
    public MyService myService() {
        return new MyService(); // Define and configure a bean
    }

    @Bean
    public AnotherService anotherService() {
        return new AnotherService(myService()); // Dependency injection using beans
    }
}
Explain the purpose of the @RequestMapping annotation
The @RequestMapping annotation in Spring is used to map HTTP requests to specific handler methods in a controller. It defines the URL pattern that triggers the execution of the annotated method. This annotation helps in handling different types of HTTP methods (GET, POST, etc.) and mapping them to appropriate controller methods.
Here’s an example that demonstrates the purpose of the @RequestMapping annotation:
import org.springframework.stereotype.Controller;
import org.springframework.web.bind.annotation.RequestMapping;
import org.springframework.web.bind.annotation.RequestMethod;

@Controller
@RequestMapping("/hello")
public class HelloController {

    @RequestMapping(method = RequestMethod.GET)
    public String sayHello() {
        return "hello"; // View name to be resolved by a view resolver
    }

    @RequestMapping(value = "/greet", method = RequestMethod.GET)
    public String greetUser() {
        return "greet"; // Another view name
    }
}
Intermediate Level: Spring Interview Questions
Let’s focus on Intermediate Level Spring Interview Questions.
What are the differences between Spring AOP and AspectJ ?
| Metric | Spring AOP | AspectJ |
| Simple/Complex | Spring AOP aims to provide a simple AOP implementation across Spring IoC to solve the most common problems that programmers face | AspectJ is the original AOP technology which aims to provide complete AOP solution. It is more robust but also significantly more complicated than Spring AOP |
| Object Scope | It can only be applied to beans that are managed by a Spring container. | AspectJ can be applied across all domain objects. |
| Weaving | Spring AOP makes use of runtime weaving.With runtime weaving, the aspects are woven during the execution of the application using proxies of the targeted object – using either JDK dynamic proxy or CGLIB proxy.JDK dynamic proxy – the preferred way for Spring AOP. Whenever the targeted object implements even one interface, then JDK dynamic proxy will be usedCGLIB proxy – if the target object doesn’t implement an interface, then CGLIB proxy can be used | AspectJ uses compile time and classload time weaving. Compile-time weaving: The AspectJ compiler takes as input both the source code of our aspect and our application and produces a woven class files as outputPost-compile weaving: This is also known as binary weaving. It is used to weave existing class files and JAR files with our aspectsLoad-time weaving: This is exactly like the former binary weaving, with a difference that weaving is postponed until a class loader loads the class files to the JVM |
| Performance | As far as performance is concerned, compile-time weaving is much faster than runtime weaving. Spring AOP is a proxy-based framework, so there is the creation of proxies at the time of application startup. | AspectJ weaves the aspects into the main code before the application executes and thus there’s no additional runtime overhead, unlike Spring AOP.AspectJ is almost around 8 to 35 times faster than Spring AOP. |
| Power | Less Powerful – only supports method level weaving | More Powerful – can weave fields, methods, constructors, static initializers, final class/methods, etc. |
| Supported Pointcuts | Supports only method execution pointcuts | Support all pointcuts |
Explain the concept of IoC (Inversion of Control) ?
Inversion of Control is a principle in software engineering by which the control of objects or portions of a program is transferred to a container or framework. It’s most often used in the context of object-oriented programming.
The advantages of this architecture are:
- decoupling the execution of a task from its implementation
- making it easier to switch between different implementations
- greater modularity of a program
- greater ease in testing a program by isolating a component or mocking its dependencies and allowing components to communicate through contracts
Read More: Inversion of Control(IoC) in Spring
What are different Spring Bean Callback Methods ?
In Spring, callback methods are special methods that you can define within your beans to perform specific actions during the different stages of the bean’s lifecycle. These methods provide you with hooks to execute custom logic when a bean is being created, initialized, or destroyed. Here are some common callback methods used in Spring beans:
- Initialization Callbacks:
@PostConstruct: Annotating a method with@PostConstructindicates that it should be executed after the bean has been constructed and its dependencies have been injected. It’s often used for initializing resources or performing setup tasks.
- Destruction Callbacks:
@PreDestroy: Annotating a method with@PreDestroyindicates that it should be executed before the bean is being destroyed. It’s used to perform cleanup tasks or release resources before the bean is removed from the container.
Here’s an example of using callback methods in a Spring bean:
import javax.annotation.PostConstruct;
import javax.annotation.PreDestroy;

public class MyBean {

    @PostConstruct
    public void init() {
        System.out.println("Bean initialized using @PostConstruct");
    }

    @PreDestroy
    public void destroy() {
        System.out.println("Bean destroyed using @PreDestroy");
    }
}
In this example, the init() method is annotated with @PostConstruct, which means it will be executed after the bean is constructed. The destroy() method is annotated with @PreDestroy, indicating that it will be called before the bean is destroyed.
Read More : Spring Bean Life Cycle
What are different types of dependency injection in Spring ?
In Spring, there are three main types of dependency injection:
- Constructor based Dependency Injection
- Setter based Dependency Injection
- Field based Dependency Injection
Constructor Based Dependency Injection
The dependency is injected through its constructor using the @Autowired annotation.
Example:
import org.springframework.stereotype.Component;

@Component
public class Customer {
    private String name;

    public Customer(String name) {
        this.name = name;
    }

    public String getName() {
        return name;
    }
}
import org.springframework.beans.factory.annotation.Autowired;
import org.springframework.stereotype.Service;

@Service
public class OrderService {
    private final Customer customer;

    @Autowired
    public OrderService(Customer customer) {
        this.customer = customer;
    }

    public String getOrderDetails() {
        return "Order placed by: " + customer.getName();
    }
}
The OrderService class’s dependency (Customer) is injected through its constructor. This ensures that the dependency is mandatory when creating an OrderService instance.
Setter based Dependency Injection
The dependency is injected using a setter method using the @Autowired annotation.
Example:
import org.springframework.stereotype.Component;

@Component
public class Customer {
    private String name;

    public Customer(String name) {
        this.name = name;
    }

    public String getName() {
        return name;
    }
}
import org.springframework.beans.factory.annotation.Autowired;
import org.springframework.stereotype.Service;
@Service
public class OrderService {
private Customer customer;
@Autowired
public void setCustomer(Customer customer) {
this.customer = customer;
}
public String getOrderDetails() {
return "Order placed by: " + customer.getName();
}
}
The OrderService class’s dependency (Customer) is injected using a setter method. This allows for optional dependency injection and allows the dependency to be set or changed after the object is created.
Field based Dependency Injection
The dependency is directly injected into the class’s field using the @Autowired annotation.
Example:
import org.springframework.stereotype.Component;

@Component
public class Customer {
    private String name;

    public Customer(String name) {
        this.name = name;
    }

    public String getName() {
        return name;
    }
}
import org.springframework.beans.factory.annotation.Autowired;
import org.springframework.stereotype.Service;
@Service
public class OrderService {
@Autowired
private Customer customer;
public String getOrderDetails() {
return "Order placed by: " + customer.getName();
}
}
The Customer dependency is directly injected into the OrderService class’s field using the @Autowired annotation. This approach can be convenient but may lead to tight coupling between the classes.
What are Spring Profiles and how are they used?
Spring profiles allow you to configure different parts of your application based on the environment it is running in. This can be useful for things like configuring different database connections for development and production environments, or enabling different features based on whether the application is running in a test environment.
Read More : Spring Profiles
@Component vs @Bean
@Component is used for automatic component scanning and bean discovery, while @Bean is used for manual configuration of beans, giving you more control over their creation and behavior.
Read More : @Component vs @Bean
@Controller vs @RestController
@Controller: This annotation designates the bean class as the controller in the presentation layer (Spring MVC Controller).
@RestController was introduced in Spring 4.0 to provide better support for developing RESTful WebService in Spring Framework.
@RestController – is the combination of @Controller and @ResponseBody. It eliminates the need to annotate every request handling method of the controller class with the @ResponseBody annotation.
Read More : @Controller vs @RestController
What is the purpose of @PropertySource ?
@PropertySource provides a convenient and declarative mechanism for adding a PropertySource to Spring’s Environment.
Read More : @PropertySource and @Value in Spring
What is the use of Spring RestTemplate ?
RestTemplate is the Spring REST Client which is used to consume RESTful Web Service APIs.RestTemplate supports HEAD, GET, POST, PUT, DELETE, and OPTIONS Http methods.
Read More : Spring RestTemplate : Spring REST Client
What is the purpose of Spring Batch ?
Spring Batch is a lightweight framework for development of batch applications.A batch job consists of multiple Steps. Each Step has ItemReader, ItemProcessor, and ItemWriter.
Read More : Spring Batch with Example
What is the use of Spring JDBCTemplate ?
The Spring JdbcTemplate is a part of the Spring Framework that simplifies database access and JDBC (Java Database Connectivity) operations. It provides a higher-level abstraction for working with relational databases compared to using plain JDBC.
Read More : Spring JDBCTemplate with Example
What is Spring Data JPA?
Implementing a data access layer of an application is very cumbersome. Spring Data JPA aims to significantly reduce boilerplate code needed for implementing Data Access Layer and also simplify the Data Access Layer, so that developer focus more on the business logic rather than wasting time and energy on building complex and cumbersome data access layers.
Read More : Spring Data JPA+Spring Boot+MySQL
Advanced Level: Spring Interview Questions
Let’s look into various Advanced Level Spring Interview Questions.
How do you Inject Prototype bean in a Singleton bean ?
To inject a Prototype bean into a Singleton bean in Spring, we can use :
- Method Injection: Use a lookup method in the Singleton bean to request a new Prototype instance every time.
- Scoped Proxy: Create a scoped proxy for the Prototype bean within the Singleton bean to ensure a new instance is provided.
- using ApplicationContext: Injecting ApplicationContext in SingletonBean and get PrototypeBean from ApplicationContext in getter of PrototypeBean.
- Using ObjectFactory : Spring provides the ObjectFactory interface to produce on demand objects of the given type.
Read More : Injecting Prototype bean in a Singleton bean
What is the use of Spring Web Flux’s WebClient ?
WebClient was introduced in Spring 5. It is a non blocking reactive web client used for consuming RESTful APIs.WebClient is the new alternative provided by Spring for the existing RestTemplate.
Read More : Consume RESTful APIs using WebClient
How do you handle exceptions in Spring MVC?
We can handle exception in Spring MVC in the following ways.
- Controller Based: -We can define exception handler methods in our controller classes. All we need is to annotate these methods with @ExceptionHandler annotation. This annotation takes Exception class as argument.
- Global Exception Handler:- Spring provides @ControllerAdvice annotation that we can use with any class to define our global exception handler.
- HandlerExceptionResolver:-Spring Framework provides HandlerExceptionResolver interface that we can implement to create global exception handler.
SimpleMappingExceptionResolver is the default implementation class, it allows us to configure exceptionMappings where we can specify which resource to use for a particular exception.
Read More : Spring MVC Exception Handling
What is the use of autowireCandidate attribute in Bean Annotation ?
We can make a bean ineligible for auto wiring by specifying the autowireCandidate attribute as false in the Bean annotation like the below.
@Bean(autowireCandidate = false)
Class1 class1() {
	return new Class1();
}
Read More : autowireCandidate attribute in Bean Annotation
What is the use of @Primary Annotation in Spring ?
The @Primary annotation in Spring is used to indicate that a particular bean should be preferred or considered as the primary choice when there are multiple candidate beans that could be autowired into a specific dependency.
When you have multiple beans of the same type and Spring needs to decide which one to inject, marking one of them with @Primary helps Spring understand which bean to use by default. This is especially useful when you want to set a default choice among multiple implementations.
Read More : @Primary Annotation in Spring with Example
What is the importance of required = false attribute in @Autowired ?
The required attribute in the @Autowired annotation is used to control whether the dependency injection is mandatory or optional.
When required is set to true (which is the default), Spring requires that a suitable bean for the injection is found. If no matching bean is found, or if multiple matching beans are found, Spring will throw an exception.
When required is set to false, Spring will attempt to inject the bean if it’s available. If a matching bean is found, it will be injected; if not, the injection will be skipped without throwing an exception. This is useful when you want to provide a default behavior when a certain bean is not available, or when you have scenarios where a dependency might be optional.
In simple terms, using required = false allows you to indicate that the dependency injection is not mandatory, and if the required bean is not available, Spring will gracefully handle it without throwing an exception.
Read More : @Autowired(required = false) in Spring Bean
What is the use of @Cacheable Annotation in Spring ?
Spring provides a caching abstraction that allows you to easily cache the results of method calls by simply annotating the methods you want to cache with @Cacheable.
Read More : @Cacheable Annotation in Spring
What are different Spring Conditional Annotations?
Spring Framework provides several conditional annotations that can be used to configure and manage the components of a Spring application based on certain conditions.
- @Conditional: This annotation is used to specify a condition that must be met for a bean to be created. For example, you can use this annotation to create a bean only if a certain property is set or a certain class is present on the classpath.
- @ConditionalOnBean: This annotation is used to specify that a bean should only be created if another bean of a specific type is already present in the application context.
- @ConditionalOnMissingBean: This annotation is used to specify that a bean should only be created if another bean of a specific type is not already present in the application context.
- @ConditionalOnProperty: This annotation is used to specify that a bean should only be created if a certain property is set to a specific value.
- @ConditionalOnResource: This annotation is used to specify that a bean should only be created if a certain resource is present.
- @ConditionalOnWebApplication: This annotation is used to specify that a bean should only be created if the application is a web application.
- @ConditionalOnClass: This annotation is used to specify that a bean should only be created if a certain class is present on the classpath.
How can you enable Cross-Origin requests in a Spring Application?
To enable cross-origin requests (CORS) in a Spring application, you can use the @CrossOrigin annotation, configure CORS globally using WebMvcConfigurer, or use filters. Here are examples for each approach:
Approach 1: Using @CrossOrigin Annotation
import org.springframework.web.bind.annotation.CrossOrigin;
import org.springframework.web.bind.annotation.GetMapping;
import org.springframework.web.bind.annotation.RestController;

@RestController
public class MyController {

    @CrossOrigin(origins = "http://localhost:3000") // Allow requests from this origin
    @GetMapping("/data")
    public String getData() {
        return "Some data from the server";
    }
}
In this example, the @CrossOrigin annotation is applied to the getData method, allowing requests from the specified origin.
Approach 2: Using WebMvcConfigurer
import org.springframework.context.annotation.Configuration;
import org.springframework.web.servlet.config.annotation.CorsRegistry;
import org.springframework.web.servlet.config.annotation.EnableWebMvc;
import org.springframework.web.servlet.config.annotation.WebMvcConfigurer;

@Configuration
@EnableWebMvc
public class WebConfig implements WebMvcConfigurer {

    @Override
    public void addCorsMappings(CorsRegistry registry) {
        registry.addMapping("/api/**")
            .allowedOrigins("http://localhost:3000")
            .allowedMethods("GET", "POST");
    }
}
In this example, we configured CORS globally using WebMvcConfigurer. We allow requests from the specified origin and restrict allowed HTTP methods.
Approach 3: Using a Filter
import org.springframework.core.Ordered;
import org.springframework.core.annotation.Order;
import org.springframework.stereotype.Component;
import javax.servlet.*;
import javax.servlet.http.HttpServletResponse;
import java.io.IOException;

@Component
@Order(Ordered.HIGHEST_PRECEDENCE)
public class CorsFilter implements Filter {

    @Override
    public void doFilter(ServletRequest request, ServletResponse response, FilterChain chain)
            throws IOException, ServletException {
        HttpServletResponse res = (HttpServletResponse) response;
        res.setHeader("Access-Control-Allow-Origin", "http://localhost:3000");
        res.setHeader("Access-Control-Allow-Methods", "GET, POST, PUT, DELETE");
        res.setHeader("Access-Control-Allow-Headers", "Content-Type, Authorization");
        res.setHeader("Access-Control-Max-Age", "3600");
        chain.doFilter(request, response);
    }
}
In this example, we created a custom CORS filter to set the necessary headers to allow cross-origin requests.
Conclusion: Top Spring Interview Questions with Answers
We covered a wide range of Spring interview questions, divided into three levels: Basic, Intermediate, and Advanced. By exploring these Spring interview questions, you’ve gained insights into various aspects of the Spring framework. Good luck, and go ace your Spring interview.
Read Next : Spring Boot Interview Questions: Ultimate Guide 2023